
Building a flexible, animated timeline in WordPress
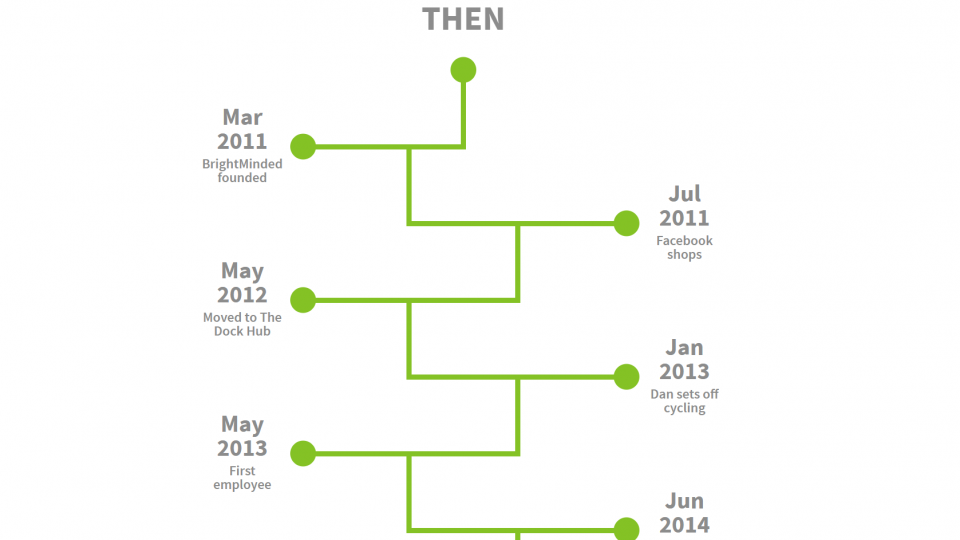
In updating our About Us page we wanted to have an interesting way to represent a brief history of BrightMinded. Annika came up with a fantastic design for a timeline which is inspired by the jagged lines inside the lightbulb of our BrightMinded logo. What was particularly interesting about this project was that we wanted this component to be as flexible as possible so that we could add or remove as many milestones as we wanted over time and it would scale well to all screen sizes. You can see the final product on our About us page.

ACF and PHP
Our site is built on WordPress and, along with the tremendously popular and invaluable Advanced Custom Fields (ACF) plugin, this allows us for a great deal of flexibility in the content displayed on a page. To allow site administrators to add as many milestones as they want to the timeline and edit or delete existing ones, I created an ACF custom field group for the timeline component.
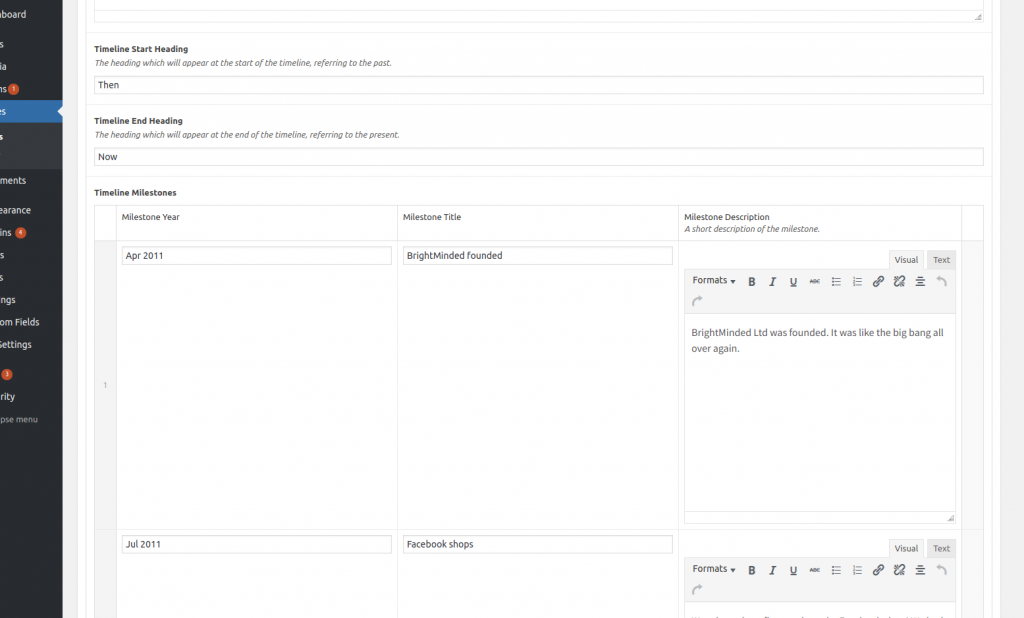
Using PHP we can then access the content of each of the fields and loop through them and output the relevant HTML. We add a container component within which we want to add each milestone. Then, most importantly, we give each milestone a class: “js-milestone-” followed by the number of the milestone, which will come in very handy when we position the milestones in JavaScript later. In our PHP we don’t worry about adding any of the lines or node heads; we will take care of that in the JavaScript.
PHP Pseudocode:
<div class="”timeline__container”">
    // Step into PHP
    $count = 0;
    foreach ($timeline_milestones as $milestone)
        increment the count
        add a div containing the $milestone content with a class of “js-milestone-count-” followed by the $count value
</div>
JavaScript
To solve the problem of flexibility, I gave the elements inside of the container a value of “position: absolute” in CSS and used JavaScript to position the elements within the container. The timeline itself is comprised of four different elements:
- Milestones
- Vertical lines
- Horizontal lines
- Node heads
There are several values which will be useful in many of the functions we’ll create later, so it would make sense to have them as global variables.
milestoneCount // the number of milestones
milestoneWidth // the width of the milestone elements
The screen size and number of milestones affect the available space in the container, meaning we aren’t sure what the length of the vertical or horizontal lines will need to be, so we’ll set these in the JavaScript.
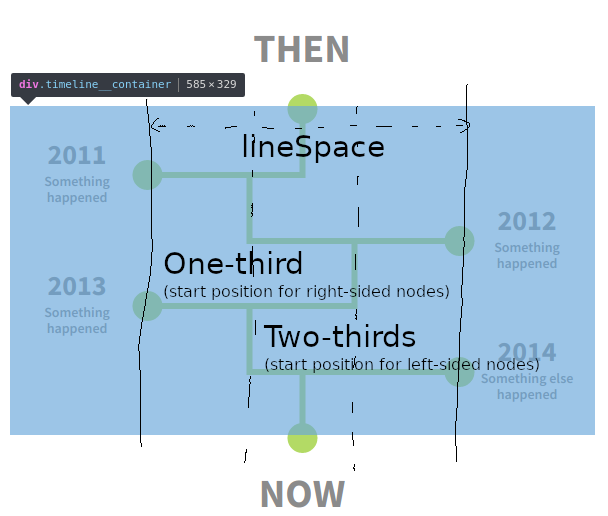
In order to position these lines later on it will be handy to know the width of the space available, so we’ll assign a lineSpace – a global variable – which refers to the corridor of space in which the lines live inside the container. We calculate this value by subtracting the width of a milestone from the width of the container.
lineSpace // the width of the corridor within which the lines will be positioned
verticalLineLength // the height of the container divided by the number of milestones + 1 for the end node
horizontalLineLength // two-thirds of the lineSpace
Adding the nodes
First we need to add the vertical and horizontal lines and the node heads, which we’ll refer to collectively as nodes, to the HTML. Each node has a vertical line, a horizontal line and a node head. We’ll use a for loop to create one for each milestone. Additionally, there’s a node head at the start and another vertical line and node head at the end. Just as we did in the PHP, we’ll give each element a class with a number relating to the milestone it will be connected to.
addNodes function pseudocode:
add a node head for the start
for (i = 1; i <= milestoneCount; i++)
    add a vertical line with class “js-vert-line-” + i
    add a horizontal line with class “js-horiz-line-” + i
    add a node head with class “js-node-head-” + i
add a vertical line for the end
add a node head for the end
Positioning the Milestones
We want the milestones to be horizontally positioned at the far sides of the container alternating from left to right. Vertically, they need to be at the and of each line. We can vertically centre them in CSS using “transform: translateY(-50%)” which will simplify things in the JavaScript. We’ll loop through each milestone and if it’s an even number we’ll position it on the right, otherwise it will go on the left. We’ll use the modulus operator (“%”) to determine if the count variable is odd or even. If count % 2 is equal to 0 then we know the number is even and the milestone belongs on the right, otherwise it’s an odd number and the milestone should be positioned on the left.
positionMilestones function pseudocode:
count = 0
for each milestone element
    increment the count
    if (count % 2 === 0)
        set the “left” CSS property of element to milestoneWidth + lineSpace
    else
        set the “left” CSS property to 0
    Set the “top” CSS property to count * verticalLineLength
Positioning the Nodes
Positioning the nodes (the vertical and horizontal lines and node heads) is very similar to positioning the milestones, but slightly more challenging. Positioning the lines vertically is as simple as multiplying the line number by the length of a vertical line. For horizontal positioning we can once again make use of the modulus operator to determine if the element belongs on the left or the right, but how far to the left or right should the lines be? If it’s a line belonging to a right-sided node, then it should be horizontally positioned one-third of the width of the lineSpace, otherwise it should be two-thirds across.
Animating the Elements
At this point we have a cool looking flexible timeline, but wouldn’t it look cooler if it were animated? We want each node and milestone to animate in as the user scrolls it into view, that way the user won’t miss the animation happening whilst they’re looking at a different part of the page. We can add an event listener which listens for the window scroll event and have it call a function which will handle our animations. Debouncer functions are very useful in preventing the function being called too frequently (more about debouncers here). We’d better also call the function when the page loads in case the timeline is already in view before any scrolling happens. We’ll apply some keyframe animations to some CSS classes and add those classes to the elements when they scroll into view.
There’s a handy “jquery-visible” plugin which we can make use of to check whether an element is visible or not. Each time the scroll event fires we can loop through our milestones and check if they’re visible. If they are, we can add an animation class to the matching lines and node head. We want the vertical line to animate in first, followed by the horizontal line, and then the node head and milestone can appear together. In order to have the animations fire sequentially in this way, we can make use of the ‘animationend’ event which is fired whenever a CSS animation reaches completion. We add an animating class to the vertical line animation, then once the animationend event fires for that we add the animating class to the horizontal line, then once that ends we add the animating classes to the node head and milestone.
animationHandler function pseudocode:
For each milestone
    If milestone is visible
        Get the milestone number from the milestone’s data attribute
        Add the animation class to the vertical line of the same number
            Listen for animationend event
                Add the animation class to the horizontal line of the same number
                    Listen for animationend event
                        Add animation class to node head of same number
                        Add animation class to milestone of same number
Resizing with Screen Width
Similarly to what we did with the animationHandler, we can also listen for a window resize event and call a resize function when it fires. The resize function doesn’t need to do anything new, since we’ve already written all the functions needed to adjust the sizes line lengths and positions, so we can just call them again. Once again, we’d better use a debouncer function to prevent the callback function being called too often and hindering performance.
Conclusion
Like most fun programming challenges, I found this was a task best solved by thinking the problem through using a pen and pad first, drawing diagrams and writing pseudocode, and then writing the code later once I knew I had an idea that made sense.
The key steps that help simplify this task are:
- Give the milestones a class and/or data attribute that indicate its number
- Use the modulus operator to determine if the element belongs on the left or the right
- Divide the available space into the relevant chunks
This has been a great project to work on and I hope this blogpost has been useful for you!
How can we help?
At BrightMinded we love a challenge. If you have a project that you need development support with get in touch, we’d love to talk to you about it.